 This is a brief how-to for anyone musing about using a disposable water cooler bottle for a fermenter in Amman (perhaps you are thinking about getting equipment from a brew shop outside the country and don't want to have to lug fermenting buckets or carboys all the way to Jordan).
- You can chuck the disposable ones out after using them once for brewing. No mess, no scrubbing, no sanitising, no fuss. Hooray!
- The disposable ones are made from a kind of plastic which is food safe and (though in theory only supposed to be used once) won't kill you. The reusable water cooler bottles in Jordan tend to be made from a kind of plastic which has been worrying people lately and is generally no longer used in other countries. Google the number on the recycling mark.
Of course, there are downsides to using any kind of cooler bottle for brewing, among which:
- They are either ridged or have handles or both. Yeast will settle on these protuberances and will give you a hard time when you disturb the liquid within. If you are intending on using re-usable water bottles and cleaning them, then good luck with that!
- Unless they are specifically designed with oxygen barriers (nobody seems to know if they are or not), then they are not going to be the best container to age beer in, as oxygen will slowly seep through the plastic and oxidise your beer. So no high-gravity beers that take ages in secondary. These are best for beers which go from 2 or 3 weeks in primary directly to bottles.
- They are either clear or light blue, which means you have to shield them from UV light (by keeping them in the dark during fermentation), or your beer will become light-struck ('skunked').
- No taps. If you're not used to brewing in a container without a tap, then you may have a hard time. everything that goes in or comes out has to go through the spout at the top, meaning you have to use a wine thief (or improvise with tubing) to take a hydrometer reading and you'd better brush up on your siphoning skills.
On the plus side: they come with all the water you will need for brewing, the caps they come with fit them perfectly and when factory-sealed they are sterile, so no sanitising needed if you are careful.
I'm assuming here that you are planning on buying the 17.5L Aquafina bottles, which you can find in most supermarkets. There are two sizes of bottle, so make sure you get the biggest, 17.5L ones. I have found that the friendliest brewing volume which comes closest to a standard 5 gallon batch involves three of these bottles, one of them empty and sanitised so you don't waste water. You could do it with two and careful estimation of how much water will boil off while brewing, but if you're not doing a full-volume boil, you would have to waste some of the water and you'd risk going under or over the volume needed and getting a stronger or weaker beer. You turn the two full bottles into fermenters by following the instructions below. Warning: extra equipment needed, so if you are trying to do this without access to a homebrew shop in another country, then you're going to have to figure out a way of fashioning an airlock which precisely fits the caps on these water bottles (this can be improvised in all sorts of ways, but getting an airtight seal is vital).


Pick a bottle and grab the little blue tab at the bottom of the lid. Pull firmly on the tab and it should tear along a pre-scored line. Continue tearing along the edge of the main cap until you've completely removed the excess plastic. The cap then needs to be prised off with a considerable amount of force (if your fingernails aren't up to it, try helping them along by padding with a cloth - soaked in sanitiser if you're doing this to a pristine bottle while brewing). Hey presto! Here is what the inside of the cap looks like. Note the three blue 'petals' which surround the central channel (which has been pierced in this bottle). These shouldn't interfere with a seal later on, but you can cut them off if you have problems.
CHECK THE CAPS VERY CAREFULLY WHEN YOU PUT THEM BACK ON THE BOTTLES! They have a tendency to split on the edge, which breaks the airtight seal. Hang onto the old ones so that you have spares in case this happens.
Sealing your water bottle with an airlock or blow-off tube.
There are two approaches I have used for this. Brewing in Jordan in the summer makes it quite likely you'll want to use a blow-off tube, as the warm temperatures can make for very active fermentations. Definitely use one if you are brewing a wheat beer. You can try to rig something up using just the blue cap, the hole in the middle and an appropriate size of tubing (see the measurements of the cap above - the tubing would have to be approximately 20mm external diameter to fit snugly, though I haven't tested this).
If you would prefer something more secure, then you can use the first approach, which is to buy 'carboy caps' from a homebrew shop abroad. These are orange flexible plastic things, I think manufactured by Youngs homebrewing supplies, which have two tubes - a central tube for an airlock and a side tube which fits 3/8 inch tubing snugly. Here's a picture of a blow-off tube in action (a few hours later, the tube was filled with foam).
These orange caps will not fit over the bare neck of the bottles. To get a snug fit, you have to have a blue cap (with the central channel open, of course) underneath the orange carboy cap. Make sure everything is sanitised and you shouldn't have any problems.
The second approach is for when you can guarantee that the beer will behave itself and ferment gently, or after the primary fermentation has died down and you want to replace the blow off tube with an airlock. You will need little rubber grommets which are sold as airlock grommets for fermentation buckets. These fit neatly into the blue caps and provide a snug fit when an airlock is fitted. Pictures below.


Where to fill your bottle to
If you are doing what I did and brewing 23.45 L of beer (leaves a reasonable headspace in the cooler bottles and approximates a 5 gallon batch, but adds the hassle of managing two fermenters at once), then allow me to save you some time. The target level that you are shooting for in both bottles to get to a combined 23.45 L is marked on the picture below. It's the second horizontal line down from the top of the wide section of the bottle.

The second approach is for when you can guarantee that the beer will behave itself and ferment gently, or after the primary fermentation has died down and you want to replace the blow off tube with an airlock. You will need little rubber grommets which are sold as airlock grommets for fermentation buckets. These fit neatly into the blue caps and provide a snug fit when an airlock is fitted. Pictures below.
Where to fill your bottle to
If you are doing what I did and brewing 23.45 L of beer (leaves a reasonable headspace in the cooler bottles and approximates a 5 gallon batch, but adds the hassle of managing two fermenters at once), then allow me to save you some time. The target level that you are shooting for in both bottles to get to a combined 23.45 L is marked on the picture below. It's the second horizontal line down from the top of the wide section of the bottle.
Three things which will help immeasurably with siphoning:
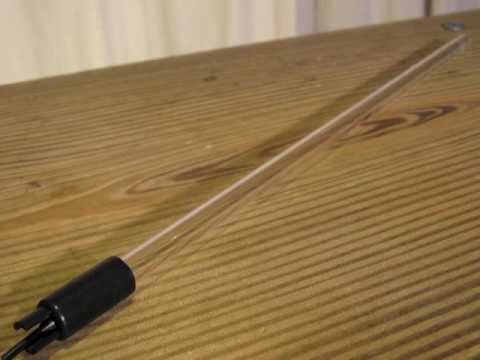 |
| A bottling wand. The little pointy bit at the end is a valve which stops flow in one direction (out of the black end) |
 |
| A hard siphon attachment. Basically a rigid plastic tube, but with a sediment trap on the bottom. |
 |
| Somebody to help. |
Images from brew2bottle.co.uk, the-home-brew-shop.co.uk and zazzle.com
No comments:
Post a Comment